
Last Updated on
There are an estimated 600 million blogs on the world wide web.
That’s a lot of noise to cut through!
If you want to start a profitable blog that delivers leads, sales, and passive income, there are some blogging best practices you need to follow.
I put together this list of best practices after my blogs started out-earning my full-time office job through passive income alone…
I don’t say that to brag, but to prove that the information found in this article is highly valuable. I’ve packed five years’ worth of blogging knowledge into an enjoyable-to-read post, just for you.
And if you follow these best practices for your blog, I’m sure you’ll start seeing success of your own!
Without further ado, let’s jump right into some blogging best practices so your blog can survive and thrive!
This article contains affiliate links. If you choose to make a purchase through a link in this article I will earn a commission at no extra cost to you.
Best Practices for Starting a Blog
In this section, I’ll be going over some blog best practices so you can start your blog right.
Even if you have a blog started already, I recommend skimming through this section just to make sure you’ve hit all the points.
1. Choose a Simple Blog Design
You don’t need to suddenly teach yourself graphic design or web design if you want a cohesive blog design.
In fact, you can brand your blog yourself by paying attention to a few key aspects.
Pro tip: bookmark by handy HTML cheat sheet to refer to when you want to edit the HTML of your blog.
Color & Typography
Time and time again, some of the most successful blogs I’ve come across have been blogs with simple designs.
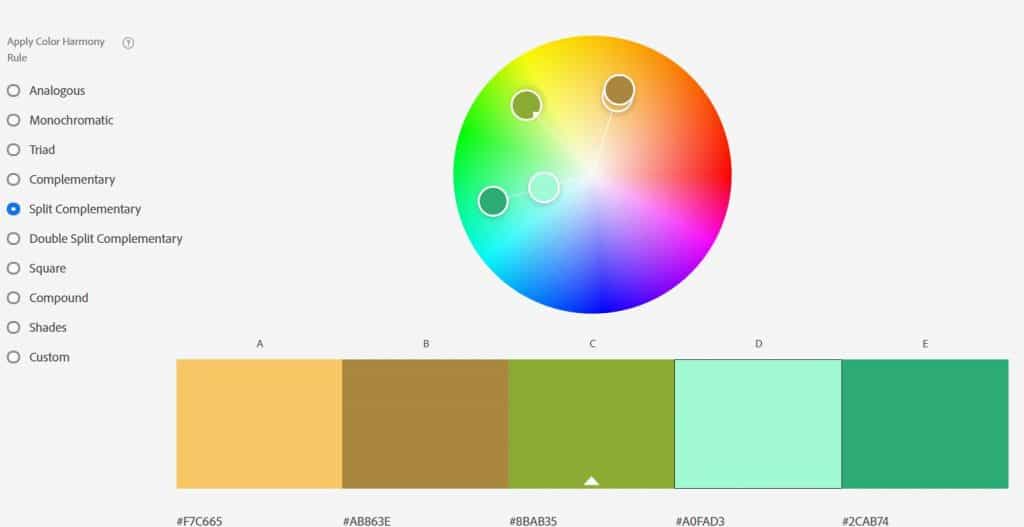
First, stick to a small number of colors in your color palette.
Two colors is the easiest to work with.
Three is a bit more challenging.
Any more and you might feel overwhelmed.
Use Adobe’s Color Wheel to automatically generate a color palette.
You also want to limit the number of typefaces you choose.
Try to stick with one or two and maaaybe three if you have an eye for design and can confidently interject the third typeface.
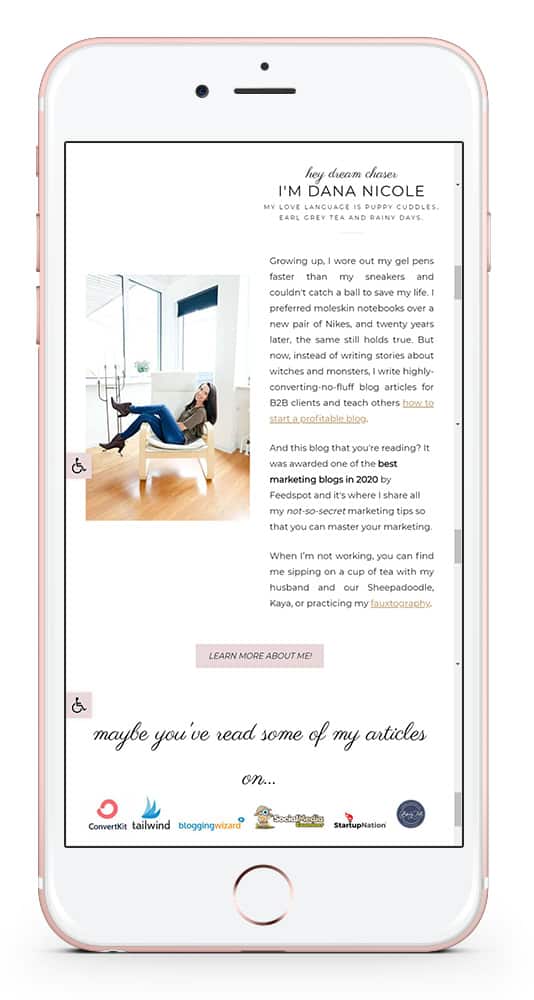
Sidebar Design
Next, let’s talk about your blog’s sidebar. There are a few items every blog sidebar should have:
- A bio with a photo of you (if you are running the blog through your name)
- Links to other blog posts
- Social media icons
- A search bar
These items make it easy for your readers to learn more about you, find more content to read and find you on other social media platforms.
Website Accessibility
Anyone regardless of situational or permanent disability or socioeconomic status should be able to access your website.
Whether your reader has blindness or a slow internet connection that prevents images from loading, they still need to be able to have the same experience as someone who is not facing any impairments.
I’ve written an in-depth guide to website accessibility for beginners that you should take a look at, but here are a few things you can do to make sure your website is accessible for everyone:
- Have large font size
- Have adequate contrast
- Use descriptive alt text for photos (we will discuss alt text in-depth further down)
- Make buttons large and clickable
- Use headings correctly
- Use tables for simple tabular data
- Add closed-captions to videos
- Use descriptive and unique anchor text
- Make links distinguishable
- Remove flashing elements
- Ensure keyboard accessibility
- Consolidate form input elements
- Remove difficult to read typefaces
Mobile Design
Make sure your blog’s design is simple for your users to navigate on both desktop and mobile (also known as responsiveness).
52% of users stated that a bad mobile experience made them less likely to engage with the brand.
Here are some quick tips to make sure your blog is mobile-friendly:
- Enlarge the font. Mobile devices make it challenging to read small fonts.
- Make sure buttons are large and clickable.
- Resize images to fit the screen.
Most well-made WordPress themes will already do most of this for you but it’s good practice to check.
You can use Google’s mobile friendly test to see where your website’s responsiveness can be improved.
2. Pick Your Niche
“What should I blog about?” <– This is the first question all bloggers ask. There are many different types of blogs that make money but here’s my advice: stick to a set of topics.
Even popular lifestyle blogs tend to write about a set of specific topics.
There’s lots of debate as to whether or not a niche is needed for blogging.
Some bloggers say yes.
Others say no.
Here are my thoughts:
Having a niche WILL help your blog in the long run.
Here’s an example.
The other day I was searching for marketing tips. I stumbled across a website, read an article and wanted to click around to read more.
But when I went to go search for more marketing tips, I found that the website was a fitness website and had written only a few articles on marketing.
Immeditately, I questioned the legitmacy of the content I had just read.
Not to mention, instead of clicking around, I left and went to find another website that was just about marketing.
Just like they say, “jack of all trades, master of none“.
Now, let’s say I had landed on a marketing article written by a marketing blog.
I likely would have clicked around to some more articles, perhaps I would have signed up for their email list and eventually, down the road, purchased a product.
When you niche down, you attract your ideal reader.
Kapeesh?
3. Get a Good Host
There are so many web hosts out there.
And finding a good one can be like searching for a needle in a haystack.
For bloggers, it’s important to go with a host that is:
- reputable
- secure
- fast
It’s also a bonus to find a host that offers good support.
For beginner bloggers, I recommend Siteground.
I’ve designed many websites and as a result, have unfortunately had to work with hosts that my clients purchased prior to reaching out to me.
Many of the popular web hosts bloggers recommend lack support and security and can be incredibly frustrating to deal with.
Siteground’s plans are not only affordable and secure, but they also have great support (which comes in handy in case anything happens to your blog).
A few of the benefits of self-hosting include:
- the fact you own your content
- you have more control over the design of your website
- you have the ability to monetize — many monetization platforms will not work with websites that are not self-hosted
4. Set up Analytics and Search Console
Analytics are a non-negotiable for your blog. If you want to work with brands or make money blogging, you’ll require analytics and data.
I chose to set up Google Analytics for my blog, but you can choose whatever analytics platform is easiest for you.
Your analytics will help you understand how your blog is performing, where you can improve and what’s working.
You also want to have Google Search Console set up and collecting data. You will use Google Search Console to monitor the keywords you are ranking for along with the position of your blog in the search results!
5. Terms & Conditions, Privacy Policy and Member Agreements
Your blog needs to be covered legally and if you think you’re exempt because your just an individual writing a blog on the internet you are wrong.
The bare minimum your blog should have is a:
- Terms and conditions policy
- Privacy policy
- Member agreement
Hiring a lawyer to draft you these documents can cost a pretty penny.
And finding free templates on Google can leave you open to lawsuits.
To be confident you are covered, I recommend purchasing legal templates.
Legal templates are the sweet spot between “I’m going to use this sketchy free policy I found on Google” and “I’m going to hire an expensive lawyer to write a custom policy”.
For all of my websites, I use Simply Done Legal. The templates from Simply Done were drafted up by lawyer Daniel Harvath.
Through video lessons, he walks you through everything you need to know to customize the templates (and cover your butt) for your blog.
And no, you can’t just copy and paste another blogger’s legal templates to your own website. Many of these templates (such as mine) have customizations unique to the blog.
Copying these opens you up to copyright infringement, which we obviously want to avoid.
Best Practices For Writing Blog Posts
Once you’ve started your blog, it’s time to write some content. Here are the blogging best practices you’ll want to follow when it comes to writing your articles.
1. Generate Ideas and Keywords
Keyword research is a part of search engine optimization (SEO) and is critical if you want to rank high in the search results and drive free traffic back to your blog.
Here’s how it works.
You first need to pick a topic for your blog post.
Let’s say you blog about camping and you’d like to write a post about the best tents.
Targeting the keyword “tents” is going to be incredibly competitive.
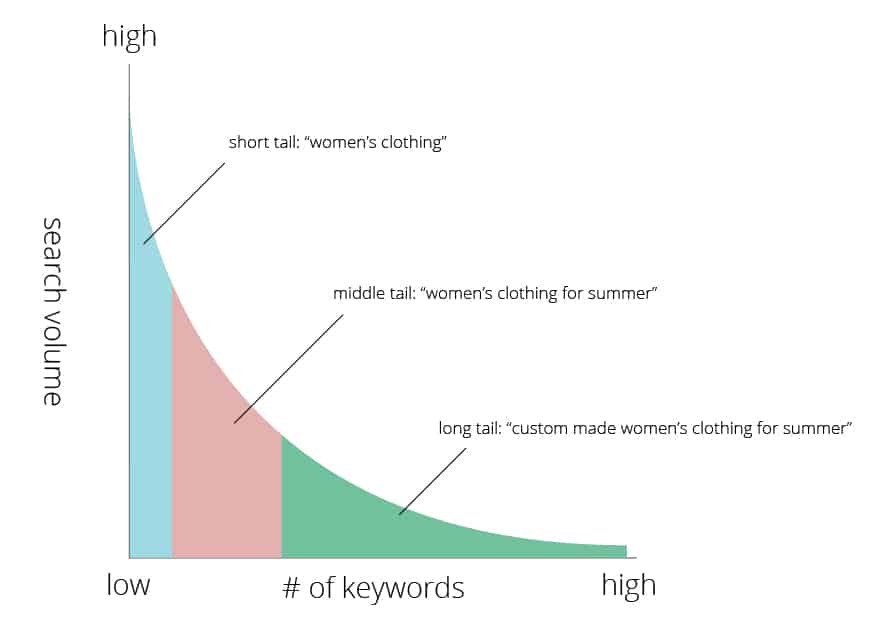
You’ll want to narrow it down a little bit and go for a long-tail keyword.
A long-tail keyword is usually around 4-5+ words.
Long-tail keywords are more specific and because they are more specific, they often have less search volume.
Luckily, because they have less search volume, they are often less competitive and easier to rank for.
Unless your blog is massively well-known, you’re going to want to target long-tail keywords.
So let’s go back to our example of “tents”. To find long-tail keywords, head to Google and type in your keyword.
Next, scroll to the bottom to view the related searches. Here, you can start to see some suggestions of long-tail keywords.
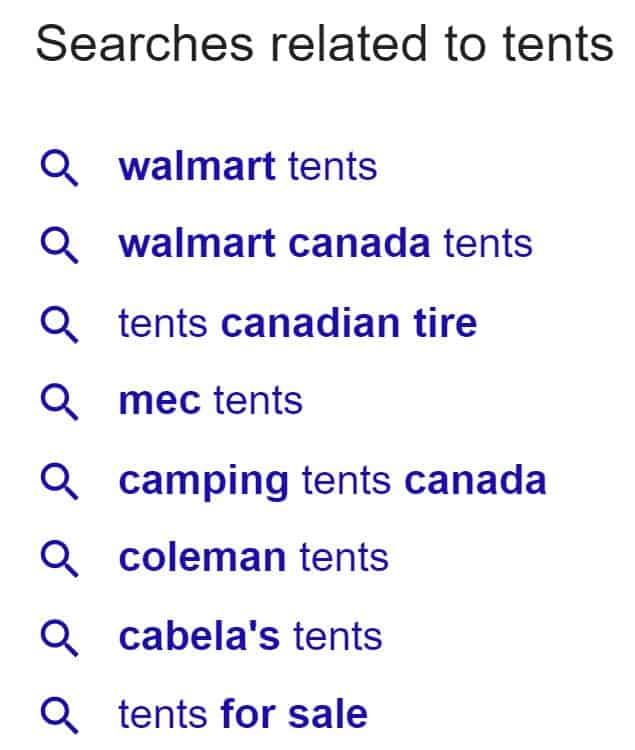
Using these suggestions, you can begin to formulate some long-tail keywords such as “best camping tents in Canada” or “best Coleman tents”.
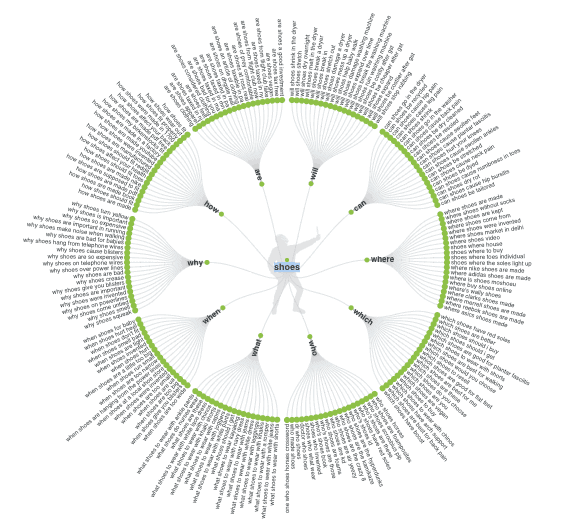
To get even more ideas for long-tail keywords, head to Answer the Public and input your keyword.

Answer the Public will spit out hundreds of related searches, most of them long-tail keywords, that you can target for your blog post.
As a new blogger, your focus should be to get a handle on SEO from day 1. SEO can take time to build up and your future self will thank you for putting in the time to learn SEO early on.
2. Write With Your Brand Voice
As a blogger, you’re going to be writing a lot and you’re going to need to write in a consistent brand voice.
Writing in your brand voice will not only improve your writing, but it will also help you become recognizable and related to your niche.
If you’re stumped on what your brand voice should sound like, read comments and social media posts from your audience to see how they are already talking.
If you speak like them, they’ll feel instantly connected to you.
3. Format Your Blog Posts Properly
One thing that separates amateur bloggers from pro bloggers is that seasoned bloggers know how to format their blog posts for readability.
Amateur bloggers tend to write in large chunks of text with long paragraphs, similar to how you might have written a paper for your high school English class.
However, online readers prefer shorter paragraphs; usually only 1-3 sentences in length.
Your content should also be broken up by headers, bullets, images and key text should be bolded or italicized to convey importance.
When you improve the readability of your blog posts, your visitors will stick around for longer.
4. Write for Humans First, Search Engines Second
Another mistake that beginner bloggers make is they try too hard to write for search engines so they rank higher.
This leads to robotic text that doesn’t serve their readers.
As a blogger, it’s your responsibility to write helpful articles to help your reader. Google’s RankBrain AI algorithm was designed to weed out content that doesn’t serve the reader.
So, ultimately, writing for people IS writing for search engines. Just make sure to keep humans at the forefront of your blogging strategy.
6. Keep Your Writing Simple
99% of the time you will want to write at a middle-school level.
Your content should be easy-to-understand by everyone who reads it.
What does this mean?
Well, as we talked about above, you’ll want short paragraphs. You will also want short sentences and vocabulary that isn’t too advanced.
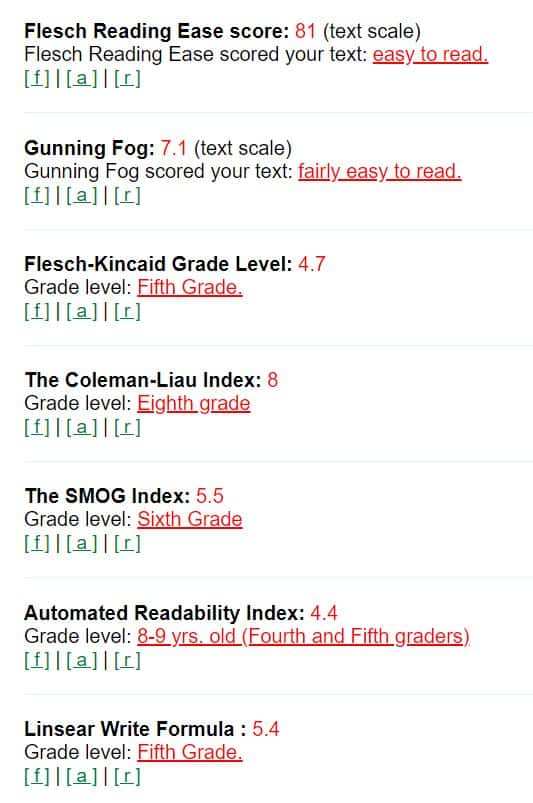
To check your writing, run it through a readability checker to see whether or not you are writing at the proper level.
Simply copy and paste your text into the readability test text editor and instantly get your results.
These are my results for a portion of the text within this article. As you can see, my writing is at a grade-school level (which is what we want).
Are there ever times when your writing should be at a higher-level? Absolutely!
If you’re writing to a highly intellectual crowd they may want formal copy.
But in most cases, write like you’re in middle school.
7. Quality over Quantity
It’s all about quality over quantity when it comes to writing.
The best blogs serve their readers, not the writer’s ego.
One of the best pieces of advice I can give to you as a blogger is to write with a “what’s in it for me” (WIIFM) mentality.
To achieve a WIIFM mentality, put yourself in your readers’ shoes to try and understand what benefits they get from reading your content.
The quickest way to write for your readers (and not for yourself) is to replace “I” statements with “you” statements.
Writing with “I” can be incredibly self-serving.
Unless you are trying to illustrate a point or give your personal recommendation, it’s best to make sure your content is “you” based.

The simplest way to do this is to use the find function (CTRL+F) and search for “I ” and “I'” (that’s a letter “I” with a space and a letter “I” with an apostrophe) and “you”.
It will automatically count the number of times you’ve used “I” (along with variations) and “you.” You’ll want to ensure that “you” is higher than “I”.
Quality content is also honest.
If you are being paid to discuss a brand, it’s important you disclose your sponsored posts and affiliate links.
8. Edit Your Content
I’ll admit, I struggle with editing my content.
I’m prone to missing subtle errors, but over the years, I’ve developed a plan that allows me to quickly catch my errors.
The first program I use to edit my content is Grammarly.
Grammarly is a freemium editing tool to help you correct spelling, grammar errors and sentence structure. I’ve wrote a comprehensive review on Grammarly and how it will make you a better write—I recommend reading it.
I also use a text-to-speech plugin called Read Aloud.
Spotting your own typos is incredibly difficult. I learned early on in my writing career that I was extra-susceptible to miss my own grammar errors.
So instead, I like to have someone read back my work to me. Hearing your writing read back will ensure you catch nearly all of those pesky little errors.
Your readers will thank you for the error-free copy by staying on your page for longer, increasing the likelihood they become an email subscriber or even make a purchase!
9. Create Captivating Titles
Once your content is just about ready to go, you’ll need to write a title that will entice users to click and read.
Fortunately, creating content titles is simple when you use a tool like CoSchedule’s Headline Analyzer.
Upon entering your prospective article title into the analyzer, CoSchedule will provide you with a score along with some suggestions and recommendations to beef up your title and make it more click-worthy.
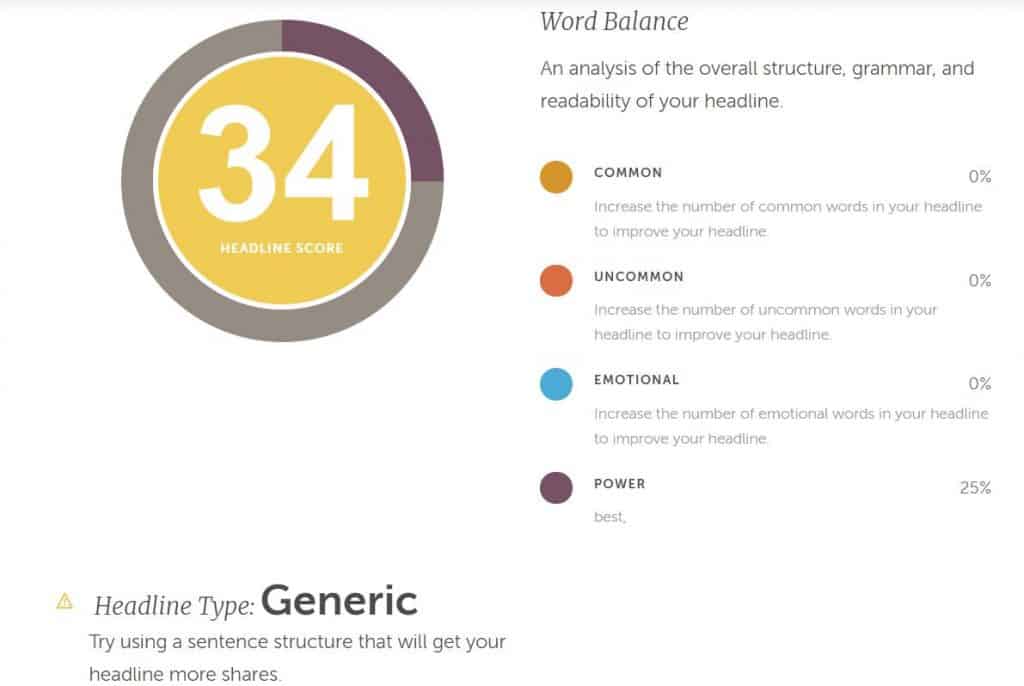
In the example above, the title I inputted was only given a score of 34 out of 100. There’s suggestions to the right to help me improve my title.
Here are a few suggestions to help you jazz-up your titles:
- use alliteration
- juxtaposition tends to result in higher clickthrough rates (use a number along with your text, i.e. 5 Ways to Reach Your Goals instead of Five Ways to Reach Your Goals)
- use suspense to incite curiosity but don’t use clickbait
- use power words
- for a change, use questions instead of statements
- A/B test your titles to see which ones result in more clicks
10. High-Quality Imagery
You have two options regarding the imagery for your blog:
- Create the imagery yourself
- Use stock photos
I use a mix of the two. If you want to create the imagery yourself, you’ll want to get yourself a good camera. There are many great cameras for bloggers you can pick from.
You may also want to go the route of stock photography. Stock photos can either be purchased or downloaded for free.
Some of the free websites I like getting my stock photos on are:
Best Practices for Optimizing Blog Posts
But before you publish your blog post you’ll want to do a bit of optimization first.
Optimizing your content will help ensure it gets picked up in search engines and is user-friendly for your readers.
1. Image Optimization
Humans process images 60,000 times faster than text. Adding imagery into your content can help your readers understand your point more effectively!
But big, bulky images are often a culprit of long load times for a website.
And with 53% of visitors claiming they will leave a website if it doesn’t load in three seconds or less you want to be confident your images aren’t slowing down your site.
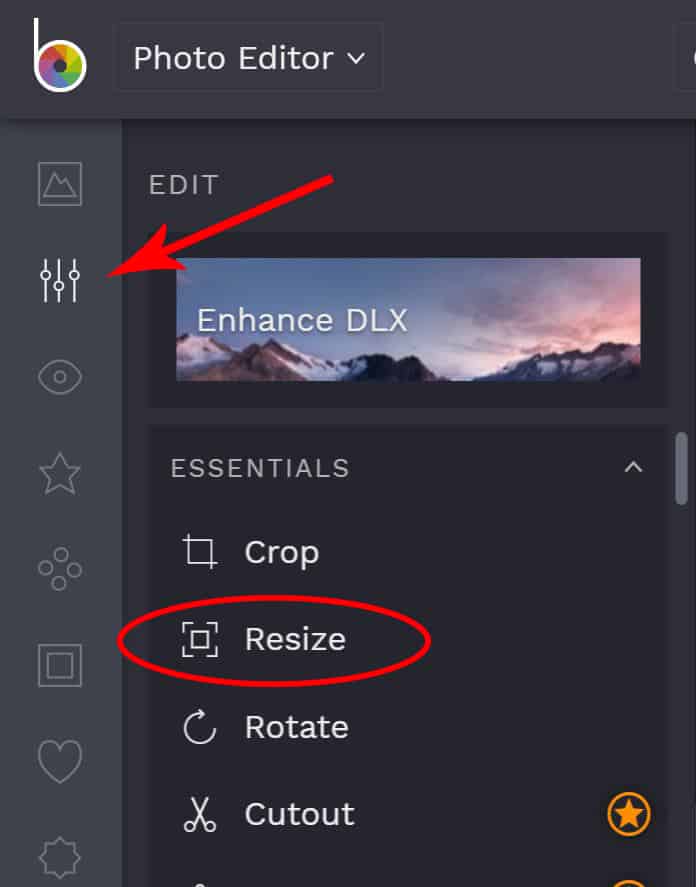
To optimize your images, the first thing we are going to do is resize them to an appropriate web-based size.
Head to BeFunky and click on “Photo Editor” under the “Create” tab.
Next, upload your image and go into the “Edit” panel along the left-hand side, and resize your image so it has a maximum width of around 1,500px.
Images that are 3,000px+ wide are much too large for a website.
I try to keep mine under 1,000px.
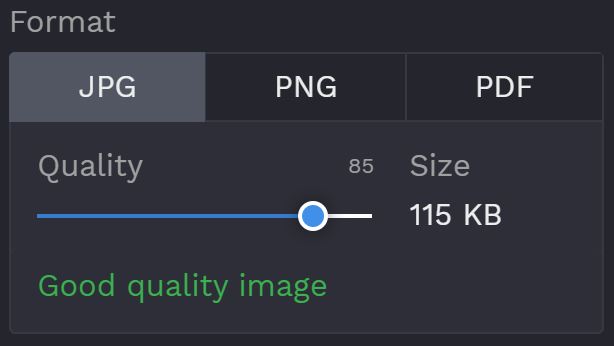
Next, save your image. Here is where you will compress your image so the file size is small enough for a blog article.
I like to keep my images under 150 KB.
After you’ve saved your image, you’ll be able to upload it to your blog posts.
If you have a bunch of non-optimized images on your website, I recommend the plugin ShortPixel to automatically compress your images.
2. Image Alt Text
We discussed website accessibility already and I briefly mentioned alt text, but I wanted to explain it a bit more in case you aren’t aware of the importance of alt text.
As a blogger, you need to get comfortable and familiar with alt text. Alt text is a bit of code that describes each image on your website, mainly for screen readers.
People with visual impairments often use screen readers to read text aloud to them.
When screen readers come across an image, it reads aloud the alt text to the user.
The alt text will also display if your image doesn’t load.
Alt text should be concise and describe the image so someone who can’t actually see your image is still able to have a rough idea as to what it is.
For example, the alt text for the below image is “puppy with big ears being held up by a woman“.

Here are a few things your alt text should not contain:
- keywords if they don’t make sense
- hashtags
- your pin description
In summary, your alt text should simply describe the image and that’s all. Alt text should not be overly complicated but it must be added in for each image.
In WordPress, there’s a box specifically to add in your alt text:

Even though WordPress states to leave the alt text empty if it’s purely decorative, I disagree.
Add alt text for all of your images.
3. URL Slug Optimization
Your URL slug is the part of your URL which relates to a specific page.
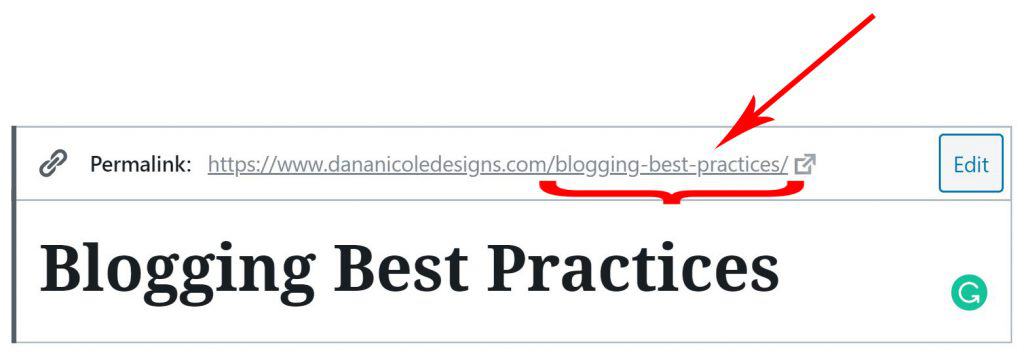
Before you hit publish, you’re going to want to optimize your slug.
If you’re working in WordPress, WordPress will automatically make your slug the title of your blog post.
In some cases, this might be ideal, but most instances will require a bit of tweaking.
A good URL slug is simple, short and contains keywords.
Let’s look at a quick example.
If the title of your blog post is “The 5 Best Hiking Trails in Montana You Can Enjoy This Summer” your URL slug might be “hiking-trails-montana” rather than “the-5-best-hiking-trails-in-montana-you-can-enjoy-this-summer“. The former is much more concise!
Your URL slugs should be clean and be free of symbols.
If you have messy-looking URLs being generated by your CMS, you may need to reach out to your web developer or your CMS support to see how to switch the settings.
In WordPress, for example, the plain setting will automatically generate a URL slug for your posts that contains numbers and symbols:
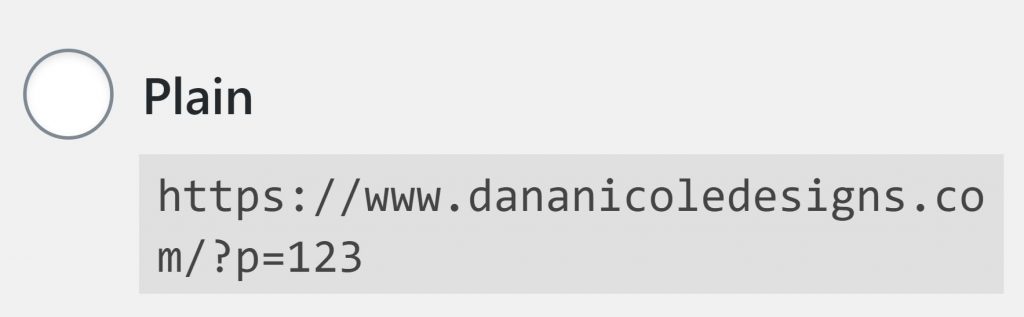
If you use this, consider switching to the post name URL so your slugs are accurate and optimized.

4. Optimize Meta Data
Your meta data is what Google usually displays in the search results:

In WordPress, you can update the meta data (meta title and meta description) by using an SEO plugin, such as Yoast.
Yoast provides each page and post with a section where you can input your own meta data.
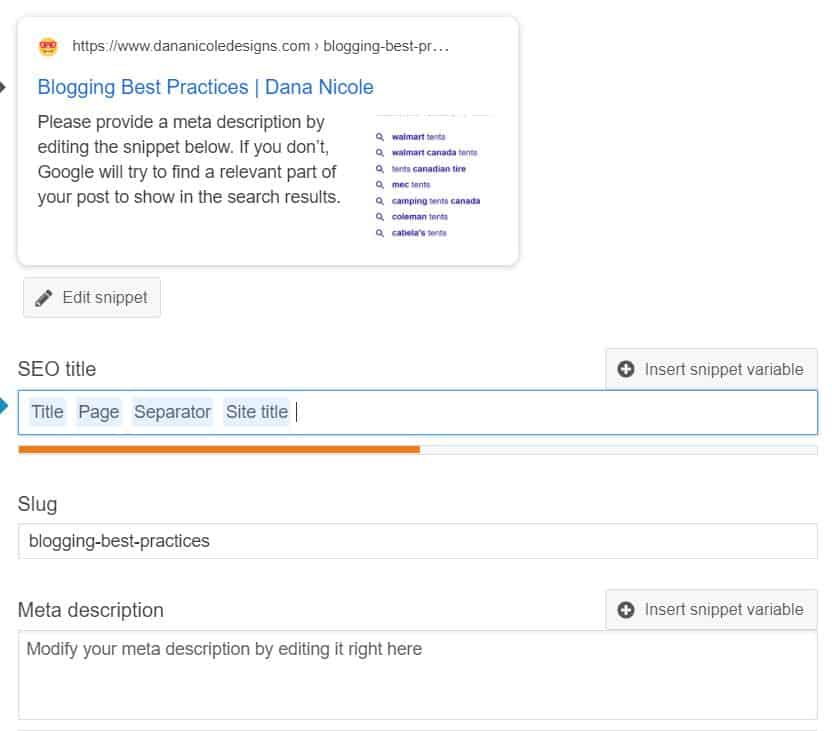
Your meta data should include keywords and be enticing enough for searchers to want to click on to your content over the other search results.
To write enticing meta data, I like to Google the keyword I’m targeting and see what my competitors have used for their meta data. From there, I try to come up with ways I can improve so users click on my content instead of my competitors.
Best Practices for After You Hit Publish
Promoting your content is equally as important as writing your content and this guide to blogging best practices wouldn’t be complete if I didn’t touch on things you should be doing after you hit publish.
1. Promote Your Posts
Without readers, how will your blog survive?
In short, it won’t.
Readers are the pillars of your blog and they need a way to find your content.
While digital ads can be incredibly expensive, there are many ways to promote your blog for free:
- promote your content within relevant Facebook groups
- build an Instagram following and promote your content to your followers
- Pin your blog posts to Pinterest as part of a for your Pinterest marketing strategy
- use SEO to drive passive traffic back to your articles
- tweet new and old blog posts
- content syndication
- answer questions on Q&A forums such as Reddit, Quora and Yahoo Answers
- build an email list and send out weekly newsletters with new content
2. Update Old Content
There are two common reasons why you might want to update old content:
- the old content is outdated and inaccurate
- increase your rankings in search engines
Outdated
Outdated content should always be updated to give readers the most accurate information as possible.
Rankings
Adding more relevant information to blog posts re-optimizing them can increase your rankings (when done properly).
In Google Search Console, you can look for keywords where you are ranking on page two re-optimize those posts to get onto the first page!
3. Check Your Analytics
Earlier we talked about how analytics are a must, but now let’s touch on what happens once you have analytics in place.
I check mine daily. I like to look for abnormalities in traffic, such as a sudden drop-off in page views (which could indicate a technical problem).
It’s also good practice to view your analytics over time to see how you’ve grown over the months.
I’ve put together a handy beginner’s guide to Google analytics for you to master your data and grow your blog!
4. Re-purpose Your Content
Reduce, re-use and recycle. The three “R”s can also be applied to blogging.
Reduce the time you spend creating content.
Re-use and recycle content.
Going through this blogging best practices guide has likely shown you the mass amount of work blogging can be.
But don’t let your articles be a one-time-thing! There are various ways to re-purpose your blog content which will drastically cut down on your content-creation process.
Here are a few different ideas to get you started:
- Turn blog posts into podcasts
- Put numerous blog posts together into an eBook
- Divide a single blog post up into several social media posts
- Create YouTube videos from blog posts
5. Publish Regularly
The golden rule to blogging, as we already discussed, is quality over quantity.
But that doesn’t mean you are off the hook for posting regular content.
There’s a stat that floats around blogging (I’ve even posted it on my blog before) that states companies who post 16 times per month tend to see better results from their blogs.
But here’s the thing…if you aren’t used to writing, posting 16 times a month might burn you out.
And once you’re burned out, it’s incredibly hard to get back into the swing of things.
You know yourself better than anyone, so if you think 16 articles a month is do-able, go for it.
Otherwise, start with one post per week and work your way up to two or three.
Keeping a content schedule along with blog batching can help you increase your productivity and remain accountable.
Conclusion: Blogging Best Practices to Follow
If you follow these blogging best practices you’ll be set up for success.
While there are many alternatives to blogging, the benefits of blogging outweigh the hard work required.
However, if blogging isn’t something you are ready to commit to, you might want to start a micro-blog on Instagram so you can dip your toes into the world of blogging without needing a website.
Remember: consistency is key and always aim to provide helpful and relevant content for your audience.
Too long, didn’t read: Jumped straight to the end? Here’s a quick summary of the blogging best practices you can follow to achieve success for your blog:
- Choose a simple blog design
- Use a simple color palette and limit yourself to two or three typefaces
- Your sidebar should have links to other posts, a bio, a photo of yourself and a search bar
- Check your blog to ensure it’s accessible and inclusive
- Ensure your blog design is responsive
- Pick a profitable niche if you plan to make money blogging
- Invest in a good host (I like Siteground)
- Get Google Analytics (or some kind of analytics)
- Get the right legal documents (terms and conditions, privacy policy and member agreements)
- Perform keyword research
- Write with your brand voice
- Format blog posts for readability
- Write for humans first, search engines second
- Keep your writing simple
- Quality over quantity
- Edit your articles
- Create click-worthy titles
- Incorporate imagery and optimize those images
- Write alt text for each photo
- Keep URLs short and descriptive
- Write optimized metadata
- Promote your posts
- Update and revisit older content
- Use your analytics to guide your blogging strategy
- Repurpose your content
- Publish regularly
Pin me:
This article may include affiliate links. As an Amazon Associate I earn from qualifying purchases.

Dana Nicole is an award-winning freelance writer for MarTech/SaaS who was rated one of the best SaaS writers by Software World. She specializes in writing engaging content that ranks high in search engines and has been featured in publications like Semrush, ConvertKit, and Hotjar.
Dana holds a Bachelor’s degree in Business Administration and has over 15 years of experience working alongside national brands in their marketing departments.
When Dana’s not working, you can find her dancing en pointe, cooking up new recipes, and exploring the great outdoors with her two big dogs.