
Last Updated on
*This article contains affiliate links which means I make a small commission if you decide to purchase from the link. The price is not inflated to include my commission and I do not recommend products I don’t love and use myself!
Nobody wants to look like they don’t know what they are doing
. And if you want to make money blogging you’re going to need to appear professional (even if you aren’t there quite yet)!
Luckily, it’s really easy to make some tweaks to give off that “pro blogger” vibe!
So without further ado, here are 10 changes you can make to your blog to give off the impression that “yes, I am a pro and I know exactly what I am doing!” vibe.
Get a Media Kit
What is a media kit, you ask? A media kit is basically a resume for bloggers that includes key statistics, information on your audience and information about yourself.
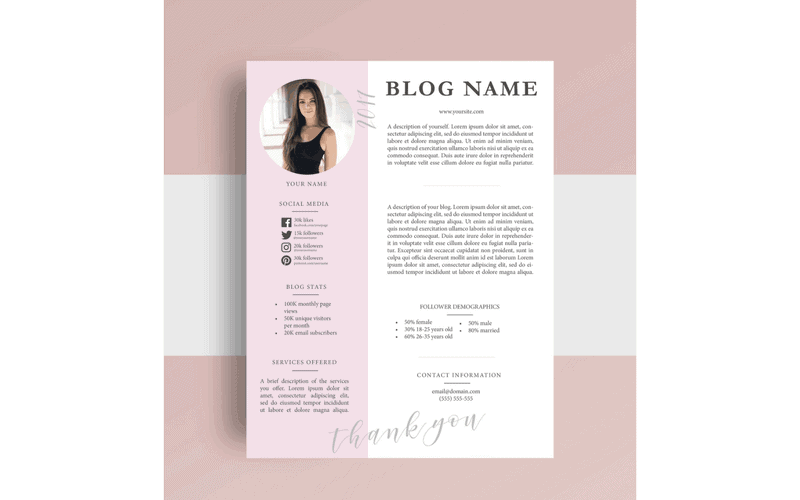
If you plan to work with brands, they’ll want to see your media kit. Even if you have a small audience, it’s still possible to work with brands! Having a media kit will give the impression that you take your blog seriously, and in turn, are a pro.
I have a free media kit template that you can download so you don’t need to worry about going any longer without one.
Brand Your Blog
I don’t know about you, but when I see an ugly website I tend to click off from it. If the design is all over the place, I assume the content is too.
Branding your blog doesn’t need to be an expensive process if you aren’t able to hire a professional designer. You can easily DIY your brand by choosing:
- a color palette
- typography
- imagery
- a clean theme
The key is to remain consistent!
Upgrade Your Theme
Just because you downloaded a free theme off WordPress doesn’t mean it will look professional. Some themes just look spammy and cluttered. You can try searching for a free theme in WordPress’s library, or you can purchase a theme off websites like Etsy and Creative Market.
My recommendation is to work on your brand first, and then search for a theme that reflects your brand! You can search for themes by using keywords that represent your brand such as “feminine” or “minimal”.
Self Host With and Buy Your Domain
If you’re using the free version of WordPress or any other platform, you aren’t self-hosting. Self-hosting is when you pay a hosting company a small fee (generally a couple of dollars a month) and they host your content on their servers for you.
There are a lot of benefits to self-hosting your blog including:
- you own your blog
- you own the content
- you can monetize your blog with ads
- the customization is endless
- it’s better for SEO
- you can easily build an email list
You also have your own URL when you self-host your blog. Brands aren’t going to reach out to someone who has a URL that comes free with WordPress. www.yourblog.wordpress.com screams hobby-blogger. While there is nothing wrong with keeping a hobby blog, if you are trying to turn blogging into something more than a hobby, it’s time to upgrade that URL and self-host!
I recommend self-hosting with Siteground* as they are very affordable and come with lots of great features such as site security, amazing support, great site performs and great site speed (which will help your SEO).
Fix Your Permalinks
A little-known fact is that the structure of your URLs can impact your SEO. Your permalinks are the URLs for different posts on your website. For example:
- www.dananicoledesigns.com/build-brand-budget
Some permalinks are automatically created to include numbers and various characters and look a little something like this:
- www.dananicoledesigns.com/sdf4?df
That is a very poor permalink! To change your permalink settings in WordPress go to “Settings” along the sidebar and click on “Permalinks”. You can then change the structure of your links.
You can also change your permalinks in your post itself by clicking “Edit”:

Pro Tip: Add keywords to your permalinks!
Website Disclaimers
For the first year I blogged, I didn’t think I actually needed disclaimers on my website.
But then, in a Facebook group I was in, someone posted asking for help because she received a letter suing her for thousands of dollars over her blog. Yikes.
At the bare minimum, get yourself a privacy policy and website disclaimer. You don’t need to hire a lawyer to get these done for you, but I wouldn’t trust hodgepodging one together either.
Simply Legal* offers a range of templates at really affordable prices. When I was looking at templates, they were going for $500 per template. That was just out of my budget considering I needed several different templates!
But Simply Legal* offers affordable packages with legal templates written up by Daniel, a former lawyer. The starter pack is all you need and you can rest assured you will be protected if anyone ever tries to sue you one day (fingers crossed that it won’t happen).
Improve Your Imagery
If you are using an old iPhone 4 to take the photos for your blog, it’s time to switch it up. And you have two options:
- invest in a camera for blogging
- use free stock photography
I use a lot of free stock photography for my website, especially for Pinterest images. Some of my favorite free stock photography sites are:
Create Categories
Categories help organize your content! And an organized blog appears more professional than one that is all over the place.
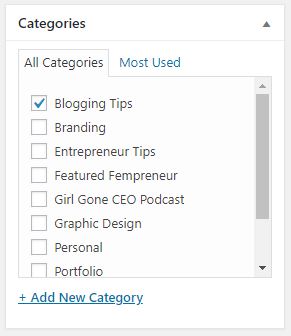
It also helps your readers navigate your content easier.
You can add categories within WordPress’s post editor. Sometimes it makes sense to add one post to several different categories, and sometimes it only makes sense to add a post to one category.
Stay away from using WordPress’s default “uncategorized” uncategory.
Stick To A Style Guide
Once you’ve created your brand, you can create a brand style guide. Your brand style guide should include various elements such as the fonts you have chosen to use, your color palette, your logo and any photography that reflects your brand.
It should be used as a reference for creating new elements and can help ensure you don’t step outside of your brand.
Change The Text in Your Footer
You know when websites say “Free theme by ___”? When a website says that in the footer it’s usually because the website has been DIY’ed and is using a free theme.
Nothing wrong with a little bit of DIY, however, your credibility goes down when it’s obvious that you don’t want to invest in yourself or your website. Instead, hide this or change it to something a bit more professional such as “Copyright 2018 www.yourdomain.com”.
It’s an easy fix that is often overlooked!
If you liked this article and found it useful, I’d love a social share!
This article may include affiliate links. As an Amazon Associate I earn from qualifying purchases.

Dana Nicole is an award-winning freelance writer for MarTech/SaaS who was rated one of the best SaaS writers by Software World. She specializes in writing engaging content that ranks high in search engines and has been featured in publications like Semrush, ConvertKit, and Hotjar.
Dana holds a Bachelor’s degree in Business Administration and has over 15 years of experience working alongside national brands in their marketing departments.
When Dana’s not working, you can find her dancing en pointe, cooking up new recipes, and exploring the great outdoors with her two big dogs.