
Last Updated on

Blogging can be slow and tedious. And on the days when you have writer’s block or are simply unfocused, it can be even harder to create quality content!
And if you run your blog, you probably manage your social media accounts, email marketing and everything else.
In other words, you’re busy, you’re jumping from task to task and you need to find a way to speed up the process a little bit!
What is Batching
Wondering what batching is? Batching is when you dedicate chunks of time to a specific process. Rather than just going back and forth between tasks, you focus a set amount of time to one activity.
Batching works because when you are able to sit down and focus on one task, your brain isn’t jumping around from task to task, allowing you to deeply focus on what it is you need to complete.
Multi-tasking leads to distractions whereas batching helps you complete tasks.
It is recommended to block out no less than a 90-minute chunk of time but if you can do longer without getting distracted, go for it!
How to Batch Blog Posts
Batching blog posts is my new favorite thing. I regularly write roughly 10-12 blog articles per month between all of my blogs and the reason I’m able to write so much is from blog batching.
So let’s talk about the proper way to batch your blog posts.
Task 1: Create A List of Blog Titles
The most important part about batching is that you need to complete the same task all at once. When it comes to writing blog posts, if you want to write several in one sitting (or one day) you will need to first start by creating a list of blog titles that you will be writing on.
In other words, you will need to do a bit of planning and preparation.
I usually try and write 10-15 different potential titles for blog posts so that I have an idea of what I’m going to be writing about (these titles are never set in stone but give me enough general direction to start).
Coming up with that many different titles can seem hard at first but it’s actually quite easy.
First, I write down as many as I can think off off the top of my head. I also try to focus the titles around a general topic. For example, I could choose “email marketing” and then try and come up with 15 different titles for articles I could write centering around email marketing.
Once I’ve run out of ideas off the top of my head, I go into Pinterest and search up my topic:
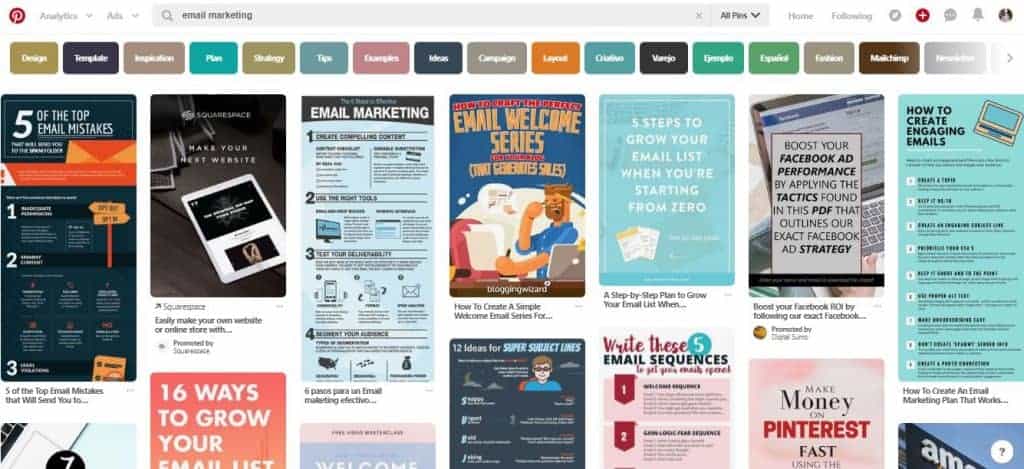
Here, I’m able to find thousands of different titles related to my topic. By doing this, I’m able to see how I can put my own spin on different titles. I never copy someone else’s idea, but rather use this as a way to inspire ideas within myself!
Once you have a list of titles, write them down somewhere so you don’t lose them.
You can use apps like Evernote or just a Google Doc. I prefer using a Google Doc!
Task 2: Research Your Topics
Now that you have your topics, you can go ahead and start researching them. I like to find supporting articles that I can use to cite in each blog post.
Copy and paste the article links you’d like to source underneath each title from your list above. This will help you immensely when you begin writing.
Even if you don’t know whether a source will fit in with your post, it’s best to add it to your list of links so you can refer back to it later. It’s always better to have more information so you don’t need to do more research after you’ve moved on from the “research” batch-phase.
Task 3: Write Your Posts
Once you have completed the research and found sources for each post, it’s time to write your posts.
I usually start at the top of my list and work my way down. And this part goes fast once you’ve already done most of the leg-work.
Sit down and write and write until you feel yourself starting to lose focus. Generally, I find that after an hour or so I begin to drift a little. After that point, I’ve usually written one (or two) posts, so I take a break for 20 minutes and then come back to continue!
If you find that writing is difficult or you are a slow typer, use a talk to text app to speak out your blog posts!
Task 4: Edit
Since you probably wrote your blog posts a lot faster than you are used to, you might have more spelling mistakes and grammatical errors than normal.
But that’s ok because one of your batching tasks should be editing.
And by this point, you’ve written all your content and now you can focus on polishing it and making sure it’s the best quality it can possibly be.
To edit your grammar and spelling, you can use the free version of Grammarly. Grammarly’s Premium version goes beyond basic grammar and is, in my opinion, much better to use for editing blog posts. You can also use the Hemmingway App to help your writing be more clear and concise.
Lastly, Capitalize my Title is a free handy little tool that corrects any capitalization errors you have in your title!
Editing isn’t just limited to grammar and spelling, however.
You should use this step as a chance to add in any links into other relevant blog posts you’ve written, email opt-ins, affiliate links or product promotion.
Task 5: Add Imagery and Get Your Post
After you’ve written and edited your blog posts, it’s time to add in the imagery, cover photos, Pinterest images and whatever other media you think could help your blog posts (and pretty it up a bit)!
Canva is a great free tool to make Pinterest graphics and cover images for your blog posts. I’ve created a single blog template where I just need to swap out the image and text to create the images for my blog posts. This saves me tons of time rather than needing to create each and every image from scratch.
Don’t forget to use keywords when naming your image files and try and incorporate keywords into the alt text! This will help your SEO.
Task 6: Update the Meta Data
Your meta data is what appears in Google and other search engines. In order to achieve a high click-through-rate (the percentage of people who click on your post when they see it in the search results), you should edit your meta data to be compelling enough to make someone want to click through.
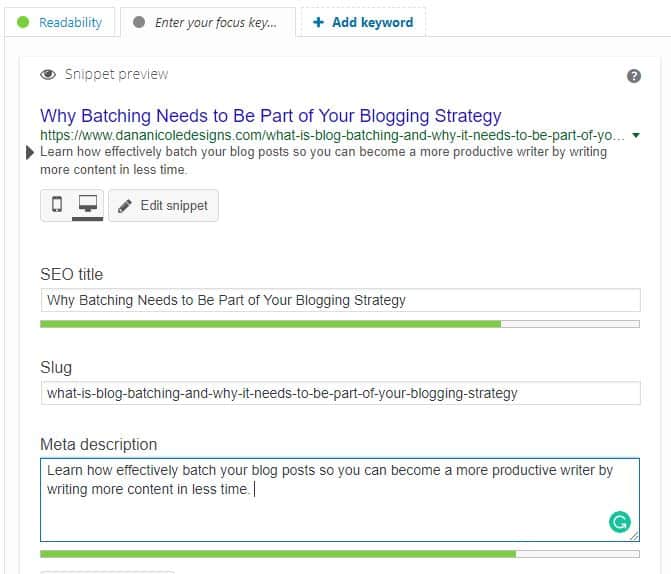
Yoast is a free plugin that WordPress users can use that makes changing the meta data very easy for your blog posts.
Task 7: Schedule to be Published
Now that your posts are ready to go, it’s time to schedule them to be posted.
You don’t want them going live all at once because you will want to take time to promote each blog post individually without overwhelming your audience!
Now that you know how beneficial batching blog posts is, will you be giving it a try? Let me know below!
This article may include affiliate links. As an Amazon Associate I earn from qualifying purchases.

Dana Nicole is an award-winning freelance writer for MarTech/SaaS who was rated one of the best SaaS writers by Software World. She specializes in writing engaging content that ranks high in search engines and has been featured in publications like Semrush, ConvertKit, and Hotjar.
Dana holds a Bachelor’s degree in Business Administration and has over 15 years of experience working alongside national brands in their marketing departments.
When Dana’s not working, you can find her dancing en pointe, cooking up new recipes, and exploring the great outdoors with her two big dogs.
Thanks for explaining how to batch blog posts. It makes sense now and would probably speed up so many of my blogging tasks. And wow … you write 10 – 12 blog posts a month?? That’s incredible and inspiring. I’m a new blogger and lucky to finish 2 a month. They’re long-form 4 – 6000 words though and it’s a journey blog, so I have to learn as I go. But I hope I can find a way to make this process work for my situation.
Hey George! 6,000 word blog posts–those must be packed with value! It’s definitely understandable that you’d be writing two of those a month because they certainly take so long to write. Nothing wrong with writing less if your content is full of value 🙂 Thanks for stopping by!
These are awesome tips! I’m a beginning blogger and often feel overwhelmed by the multitasking! Thank you for the great insight on how to be more productive.
Glad you enjoyed the tips, Katie!
This was very helpful tutorial. I’m a newbie blogger myself and I think this is great for someone who is getting started, because it helps us to focus and actually be productive with the dozens of blogging tasks we have!
Thank you so much
Yes! It’s so challenging (especially in the beginning) to juggle all those tasks. Hope you find success with batching, Vanessa!