
Last Updated on
If you’ve been blogging for a bit of time now, you have probably come across someone who has told you that “the money is in the list” and you’ve either:
a) ignored it and moved on with your life
b) thought to yourself “maybe I should start looking at growing my email list…”
and since you’ve landed here, I’m guessing you are looking to build an email list! My friend, you have made a very good decision. In fact, email marketing (aka your email list) is 40 times more effective than Facebook and Twitter combined when it comes to acquiring new customers.
Before getting too in depth here, I’m going to explain how email marketing works. Essentially, you are collecting email addresses to send weekly newsletters to. Within those newsletters, you may sometimes try and sell something or promote a product of yours.
Email lists also help you build strong connections with your audience and develop deep relationships with your readers.
So let’s look at how to build an email list from scratch so you can grow your readership and business!
Do You Need An Email List?
Your first step is to determine if you need an email list. Ask yourself this question: do I have: something to sell/promote/an audience I want to be able to connect with?
If the answer is yes, you will need an email list 🙂
Most likely the answer will be yes and I highly encourage anyone with a website to work on growing their list.
Alright, that was easy enough…moving on!
Choose An Email Marketing Platform
Your next step is to integrate an email marketing platform to your website. An email marketing platform is a service that will collect all your email addresses for you, and allow you to manage them and send emails from within their platform.
There are so many different platforms you can choose to build an email list on, but I recommend Convertkit which is what I use. The above link will also get you a 30-day free trial, but if you have less than 1,000 subscribers you can use ConvertKit’s free plan after your trial has ended!
One reason I love ConvertKit so much is the ability to segment your email list. ConvertKit uses something called “tags” and you are able to automatically apply “tags” to certain subscribers. For example, if I had a blog post with a free download for an SEO checklist, I could set up ConvertKit to automatically add a tag that says “Interested in SEO” to anybody who downloads that checklist.
Or, if I had a blog post that had a free guide on Instagram marketing, I could set ConvertKit up so that anybody who downloads that guide is tagged with the tag “Interested in Instagram marketing”.
Now in the future, if I were to ever sell any type of product or service related to Instagram or to SEO, I’d have a list of people who I already know are passionate about either topic, who I could reach out to directly.
The tags within ConvertKit allow me to tailor my content specifically towards different segments of my audience, which is super important as segmented email lists get nearly 60% more clicks!
Once you have an email marketing platform chosen (and you’ve integrated it with your website) you are ready to start building your email list!
Create A Blog Post With An Opt-In
The first and most popular way to grow an email list is by offering some type of freebie or content upgrade for a blog post.
A freebie is something that your visitors can access if they enter their email, and in exchange will be sent your freebie.
Good freebies are ones that add additional value to your blog post such as a:
- checklist
- cheatsheet
- guide
- printable
- e-book
- audio transcript of your post
- challenge
- template
You can either craft a brand new blog post or use an existing one. If you have a blog already started, I recommend using a post that is already generating traffic to add a content upgrade to. Here’s how you can find out.
Go into your Google Analytics and click on “Behaviour –> Site Content –> Landing Pages”.
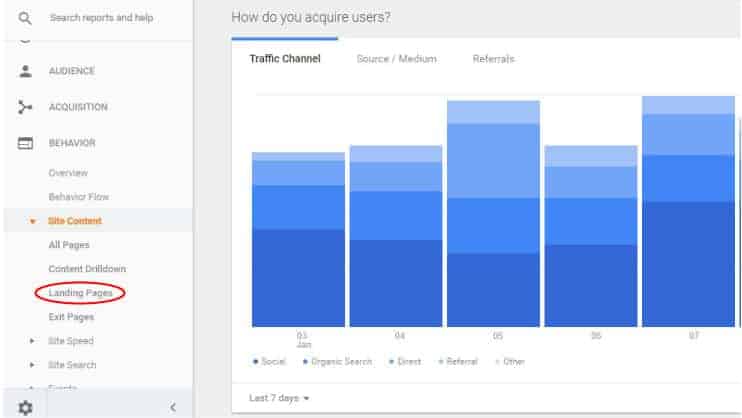
This will bring up a list of the top landing pages within your blog. Take a look at your top pages, and create freebies around each of them.
If you don’t have Google Analytics installed, I created a tutorial on installing Google Analytics for WordPress. You can also look at your blog posts that generate the most social shares and/or comments, in order to see which ones are popular without needing any analytics.
Although, I highly recommend setting up some analytics if you don’t have them yet!
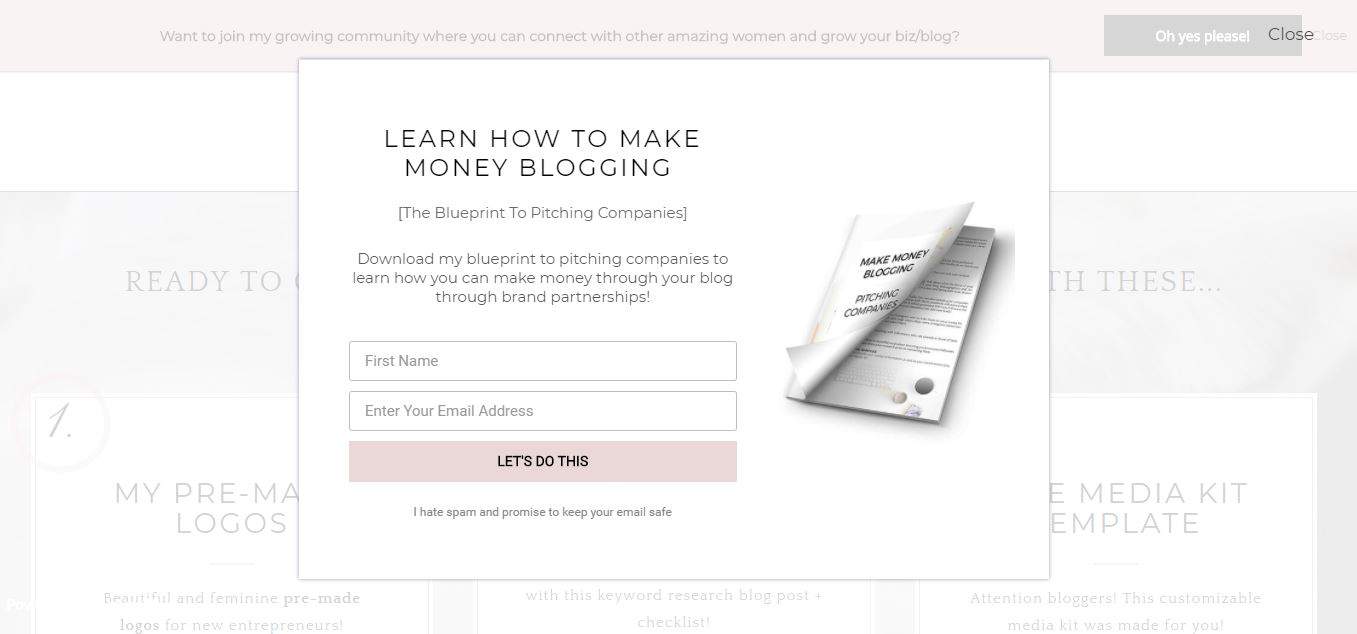
Once you’ve created your freebie, you will want to include it throughout your blog post. ConvertKit makes it super easy to create attractive opt-in forms like the screenshot of the one I have below:

Add A PopUp (Or Slide In or Bar)
You may think popups are annoying, but they are super effective in generating leads. I have one popup on my website currently and I have it set to display any time a use is about to leave (which is referred to as an exit-intent popup).
For popups, I use a plugin called Convert Plus (affilaite link) which I love for a few reasons.
First, it allows you to fully customize the look of your popups, when they appear, and for whom they appear for. You can schedule them to show only on specific devices, or pages, or during specific times. For example, I love exit-intent popups (ones that show right as the user is about the click away) and Convert Plus allows you to create those.
Add Subscribe Options To Your Website
Aside from popups and bars, you should also have subscribe forms at the end of each blog post and throughout other pages of your website as well.
Generally, these forms don’t do as well as a freebie would. People usually aren’t going to give up their email address if they aren’t getting a freebie in return, but there are people every now and again who will enter their email in, and if you are looking to build your email list, you don’t want to miss any opportunities to collect a lead!
Send A Weekly Newsletter
Whether you have 1 or 10,000 subscribers, you will want to get into the habit of sending a weekly email. You may think that weekly is too frequent, but I’m here to tell you that it is not.
When it comes to email marketing, you need to be showing up in your subscriber’s inbox regularly so they remember who you are. If you choose to email them once a month, they will go 30 days without hearing from you and when you suddenly appear in their inbox, they’ll likely forget who you were and hit “unsubscribe”.
You don’t want people unsubscribing because they forgot about you, and by keeping a weekly newsletter you can ensure that won’t happen.
Let’s review the steps you need to take to build an email list from scratch:
- Sign up with an email marketing platform. I use ConvertKit!
- Create a blog post or determine what your top blog post is
- Create a freebie/content upgrade for that blog post and include a signup for it within your post
- Add general email sign ups to your website
- the end of each blog post
- your sidebar
- your homepage
- Add a popup/bar/slide in or a combination of the three inviting people to sign up for your list
- Send a weekly email to your subscribers
And that’s it! I hope this tutorial will help you as you begin to build your email list. I’d love a social share if you found this post helpful!
Pin me:
This article may include affiliate links. As an Amazon Associate I earn from qualifying purchases.

Dana Nicole is an award-winning freelance writer for MarTech/SaaS who was rated one of the best SaaS writers by Software World. She specializes in writing engaging content that ranks high in search engines and has been featured in publications like Semrush, ConvertKit, and Hotjar.
Dana holds a Bachelor’s degree in Business Administration and has over 15 years of experience working alongside national brands in their marketing departments.
When Dana’s not working, you can find her dancing en pointe, cooking up new recipes, and exploring the great outdoors with her two big dogs.