
Last Updated on
Today I am going to cover how to start a blog on WordPress! If you are looking to blog on WordPress, follow along in this easy (and incredibly comprehensive) guide.
In this guide, we will be discussing
- How to choose your blogging niche
- How to choose your domain/blog name
- How to choose your web hosting
- How to install WordPress for your blog
- How to login to your WordPress blog
- How to select a theme
- What plugins should you use to blog
- How to write a blog post and publish it
Blogging has been one of my favourite past-times. I absolutely love to write and I love getting to connect with other like-minded writers, either through blogging collaborations or by helping them design their website/blogs. But you don’t need a professional design to start blogging on WordPress.
In fact, you can start a blog on WordPress for basically nothing! And when done correctly, your blog can actually make you money and help you pay off debt.
First, let me say that a lot of people get into blogging for the wrong reason. They get into it because they want to make money online instantly. It’s not that easy (although if you do want to make money online, like RIGHT NOW, I’ve got a blog post on how I used to teach English online without a teaching degree, and make a little extra cash on the side).
But back to blogging. Blogging does take time to build up and takes tons of work.
But if you’re ready to actually put in the work (which I know you are) then let’s get started on how to start a blog on WordPress!
Step 1: Choose Your Blogging Topic
First, you want to choose a topic/niche to write on. When choosing a topic, you want to answer three questions:
- Does this topic get enough traffic?
- Do I have an interest in this topic?
- Can I write lots of high-quality posts on this topic?
Does This Topic Get Enough Traffic?
I hate to be the bearer of bad news, but it’s REALLY hard to blog about something that is very specific and grow your blog through it.
If you plan just to blog as a past-time (and your goal is just to write for fun, with no goal of measuring your analytics or growing an email list) then you can pretty much pick whatever topic you want.
But if your goal is to build a blog that generates traffic and helps you earn money, then I suggest picking a topic that will get you traffic.
So how do you find a topic that will get you traffic?
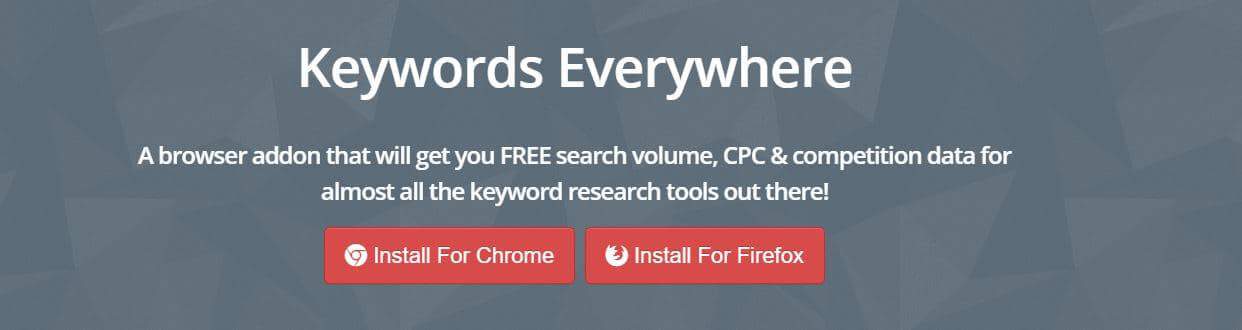
First, head to Keywords Everywhere and download it to your browser.
After you select which browser you want to install it to, you will be asked to confirm whether or not you’d like to install it.
Once you install, you will be asked to fill out your email:
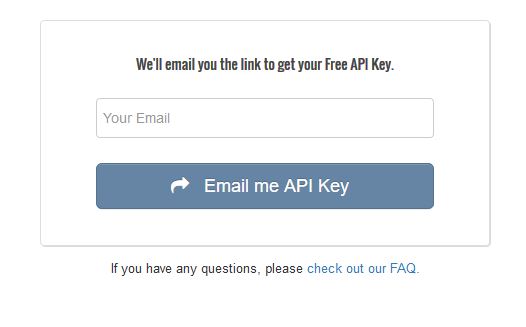
An API key will be emailed to you through the email that you provide. So once you submit your email, go check for your API key.
You should get an email right away that contains a link – click on that link and you will be brought to a page that has your API key!
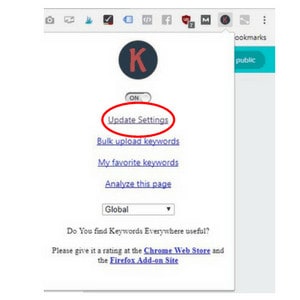
Next, click on the Keywords Everywhere icon in your browser, and then select “Update Settings” in order to update your API key.
Keywords Everywhere is going to tell you how many monthly searches a particular topic has! So now, head over to Google and type in your topic.

So as I’m an expat wife, I could easily start a blog on WordPress on the topic of being an expat wife. But when I search for “expat wife” in Google, I can see that there are only 140 searches per month for that term…
That term is probably a little too narrow!
Now, as an expat I travel around a lot. So perhaps I could expand my focus to include topics about travel and expat life. So let’s search for “travel”:

The term “travel” has over half a million monthly searches. That tells us that this topic is much more popular than “expat wife”.
This doesn’t mean I shouldn’t write about life as an expat wife, but it just means that the overall topic of my blog isn’t going to be solely on being an expat wife, and will cover other topics.
Do I Have An Interest In This Topic?
If you want to start a blog on WordPress (or just start a blog in general) you need to have an interest in the topic and be able to write high quality posts weekly.
If you don’t think you have enough of an interest to write hundreds of posts on that particular topic, it’s time to go back to the drawing board and come up with another topic that you want to blog about.
Too many people start blogging with the sole intention of making money, but then get quickly burnt out when they don’t start making money and realize how much they need to write.
Blogging is lots of work but can be totally fun if you choose a topic you are passionate about!
Can I Write High Quality Posts On This Topic?
Do you know enough on the topic to actually write high quality posts? I’m talking 1,000+ word blog posts. Or, are you willing to put in the work to research the topic so that you are able to write quality posts on it?
Take a look at this:

The average post length on page one of Google is nearly 2,500 words!
Blogging is cheap to start up which in turn has made it a very competitive industry. Anyone with a computer can start a blog on WordPress and get blogging, so you want to make sure that you will be able to write high quality posts.
Step 2: Choose Your Domain/Blog Name
The next step to starting a blog on WordPress is to choose your domain + name for your blog. (Don’t purchase your domain quite yet).
The most important step when choosing your blog’s name is to see whether or not your domain is available (before you get too attached to it).
To find out if your potential domain is available, head to Name.com and enter your domain name in.
You might be wondering how to choose the best domain name.
Choosing a domain name is a very important process when building your blog.
Use Keywords
Keywords in your domain hold a high importance. If you are writing about backpack traveling, try to use the word “backpack” in your domain.
If you want to write about dogs, use the word “dogs” in your domain. Pretty simple.
While this is not mandatory, it definitely can help your SEO.
Choose A Domain Extension
The domain extension is the “.com” or “.co” part of your domain. I always recommend going with “.com” if available. Most people will automatically type “.com” after your domain when trying to find you, so if you can, try and get “.com”.
The Shorter, The Better
In order to be memorable, keep your domain name short. It’s easier for your user to type in which means it will be easier for you to get direct traffic.
Write It Down Before Buying It
This is a tip that most people don’t do. Write your domain name out before you buy it!
For example, Speed of Art when turned into a domain turns into: www.speedofart.com (Speedo Fart, anyone?).
Writing out your domain to see how it looks can save you from some embarrassment – take these examples of unintentionally embarrassing domains!
Step 3: Get Hosting For Your Blog
Once you’ve determined your domain, your next step to starting a blog on WordPress is to purchase hosting.
While you can start blogging for free, it’s better if you own your domain and self-host. This is because if you blog for free, your content is owned by WordPress. Plus, it looks way more legit if you actually have your own domain (and it’s not expensive either)!
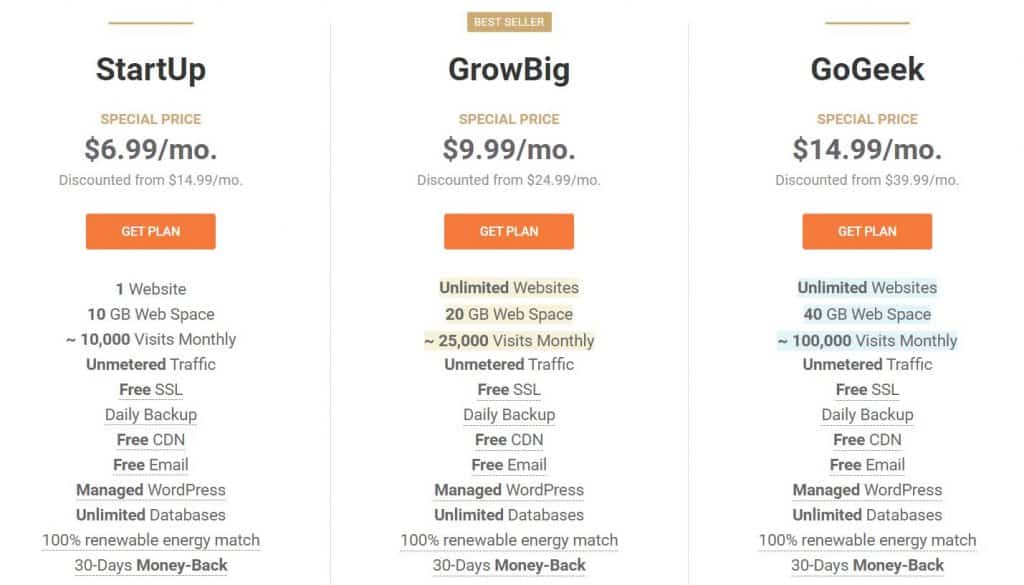
To get set up with hosting, I recommend using Siteground*. I use Siteground* for my web hosting and recommend that all my clients do too. (*please note this is an affiliate link, however, my own website is hosted through Siteground and I encourage all my clients to go through Siteground as well. I am going to explain why I recommend them in the next section)!
With Siteground, you get a free domain(Siteground only offers free domains during specific periods and sales now) and their starter hosting plan is only $6.99 a month.
The starter plan is a great plan to start with, as you can upgrade at any time! And at $6.99 a month, it’s one of the more affordable hosts available.
As a web designer, I’ve worked with many hosting platforms and am nearly always left disappointed. Either they are slow, their support is non-existent or they experience way too much server downtime.
And if their servers go down, your site goes down with it (which is not good)!
Now, let’s talk about a few of the reasons why I trust Siteground for myself and for all my web design clients.
Siteground Hosting Is Fast
Google does not like slow websites! If you want to make sure you are appearing in the search results, you will want a website that loads fast.
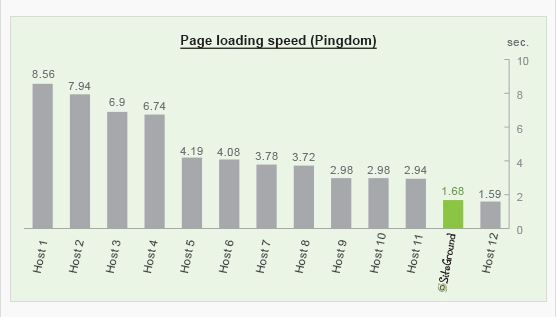
When testing the same WordPress website hosting over various hosts, Siteground offered one of the fastest page loading times.
Siteground Is Safe
Like I mentioned earlier, it takes a lot of work to build up a blog. Imagine spending hours each week building up a blog, to suddenly have it hacked and gone?
SiteGround was the pioneer in applying effective account isolation mechanisms to shared hosting environments.
Which helps protect your website and blog from getting hacked.
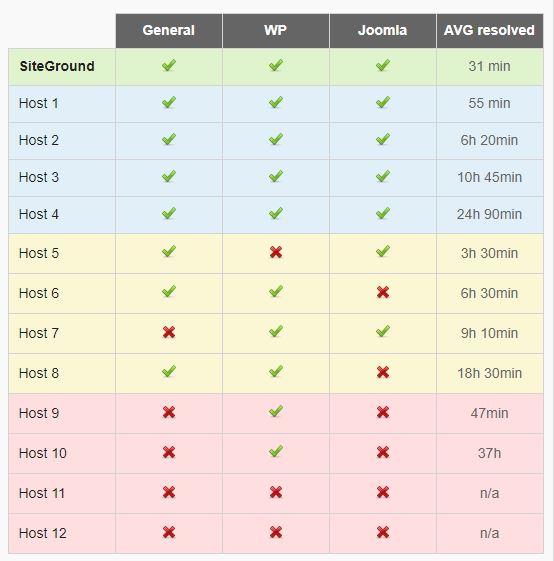
Siteground Has Great Support
And I really mean that. Do you know what to do if your site suddenly crashes because you’ve accidentally done something on the backend that you shouldn’t have? I’ve worked on client sites before where I’ve been dealing with different hosts. I was once working with one of Siteground’s top competitors (which I won’t name) and their support left me waiting for an hour and a half, and they were unable to answer my question! After an hour and a half, I finally figured it out on my own. I was very disappointed!
And trust me, unless you plan to have a web developer on retainer (which is pretty expensive) you’ll want to have a hosting company with excellent support.
Maybe you added a plugin and it conflicts with another plugin on your website and BAM, your website is broken (it happens). Siteground will be able to fix 99.9% of your problems (They’ve fixed 100% of mine).
Siteground has amazing customer support. Their support is always online. You can contact them through phone, online chat or by submitting a ticket.
I can’t say enough good things about their support, but see for yourself!
(Ok, have I fangirled enough about Siteground’s support yet?)…
Free Site Transfers
If you’ve already been blogging on a different platform or host, and you’d like to make the switch, Siteground will make the switch for you FOR FREE! This can cost hundreds of dollars with other hosts.
Backups
With Siteground, you have the ability to access your backups. It’s always better to be safe than sorry, and I feel confident knowing that Siteground has backups of my website just in case anything were to ever happen.
Step 4: Install WordPress On Siteground
After you have your hosting paid for, you will need to install WordPress on Siteround. You have two options at this stage:
- Do it yourself
- Have Siteground do it for you
Let’s talk about how you can install WordPress on Siteground.
Upon logging into Siteground for the first time, you may be prompted with the following:
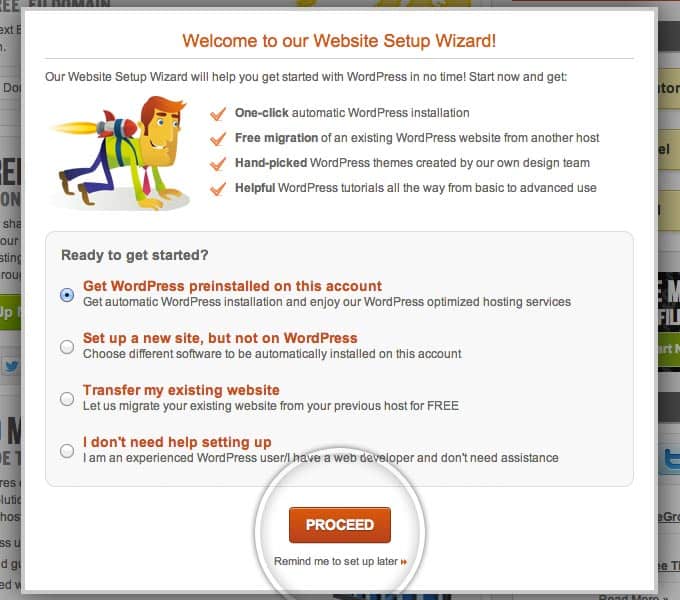
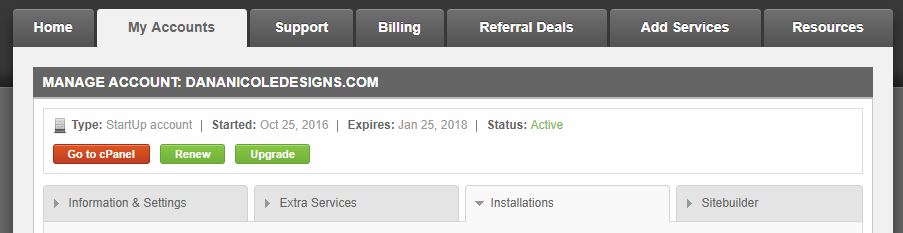
If you see this, click “Proceed”, however, if you don’t see this you will need to go into your cPanel.
In order to get in your cPanel you will need to go into the “My Accounts” tab of your Siteground account and click the orange “Go to cPanel” button.
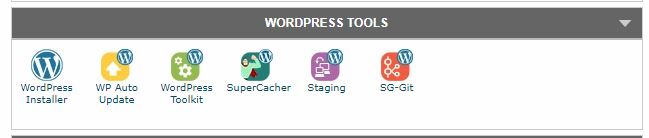
Once in your cPanel, you will need to find the “WordPress Tools” section:
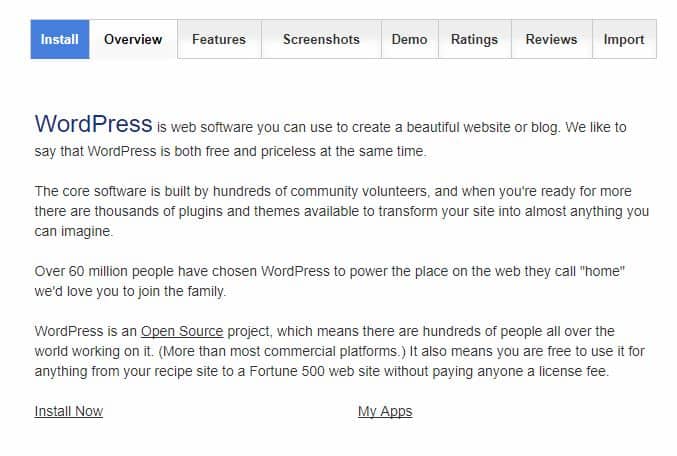
Next, select “WordPress Installer” and then scroll down to find the “Install Now” link.
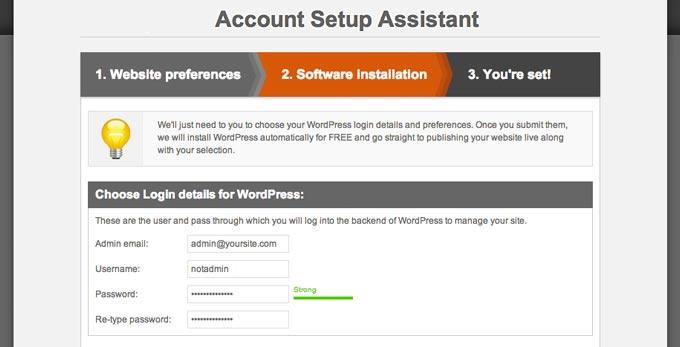
You will now be asked to fill out your login information:
After you have entered your password and username, you will be asked to choose a theme. For now, you can click any one because you can change it later.
After choosing your theme, you will get a summary of your information. Don’t forget to write this down!
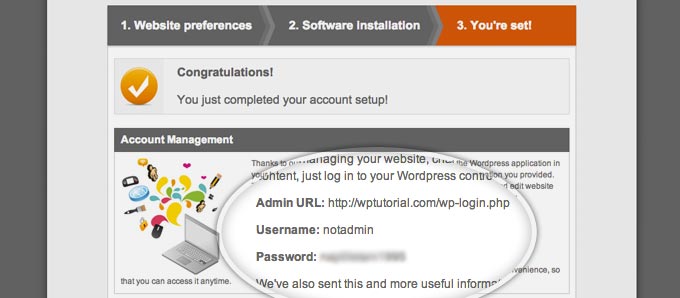
You will need to enter the admin URL in order to access your site’s login page, so don’t forget that important piece of information!
Step 5: Log Into Your WordPress Blog
Now you need to actually design your blog! I remember first setting up my blog and being totally lost at this part. I had no idea how to log in…
To log in, you need to visit your Admin URL which is usually just “www.yourdomain.com/wp-admin” and enter your username and password.
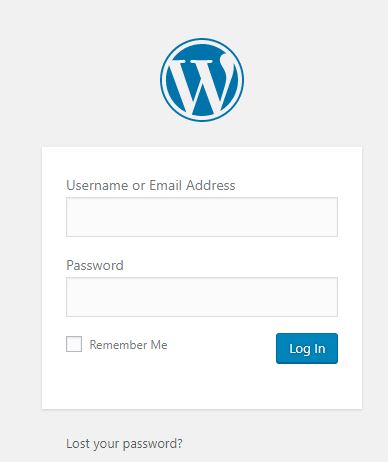
If you don’t remember your username or password or can’t log in, contact Siteground support and they will be able to point you in the right direction!
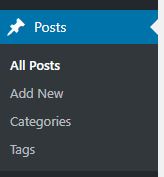
When you get logged in, you will notice different tabs along the left-hand side of your blog:
- Dashboard: Clicking on this will bring you to the dashboard that you see after you first log in.
- Posts: This is where you write your blog posts. We will discuss this further on.
- Media: This is where you upload any images, videos, audio clips or PDF’s that you want to have on your blog.
- Pages: This is where you will create pages for your blog. A page is something like “Home”, “About”, “Services” and is different than a post. A post is a blog post, whereas a page is a static page on your website.
- Comments: Here is where you can manage your blog comments.
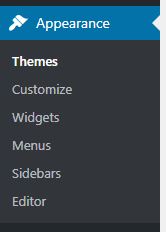
- Appearance: This is where you can customize how your blog looks. You can learn how to customize your blog post here.
- Plugins: You can add various plugins (such as contact forms, popups, email list builders) to help with your blog. These aren’t necessary but as you get more familiar with WordPress you will find yourself wanting to add plugins.
- Users: Under this section you can add different users. If your blog will just be written by you, you don’t need to worry about this part.
- Tools: There are some other tools listed in here that you likely won’t need to use.
- Settings: Again, some more settings that you can use for your blog.
Step 6: Select A Theme For Your WordPress Blog
Once you are logged in, you will notice your site is very plain. WordPress runs off themes, so you have the ability to change your theme to something that suits your style and your taste.
From your WordPress dashboard, click on “Appearance –> Themes –> Add New”.
Once you select “Add New” you will be brought to the theme library.
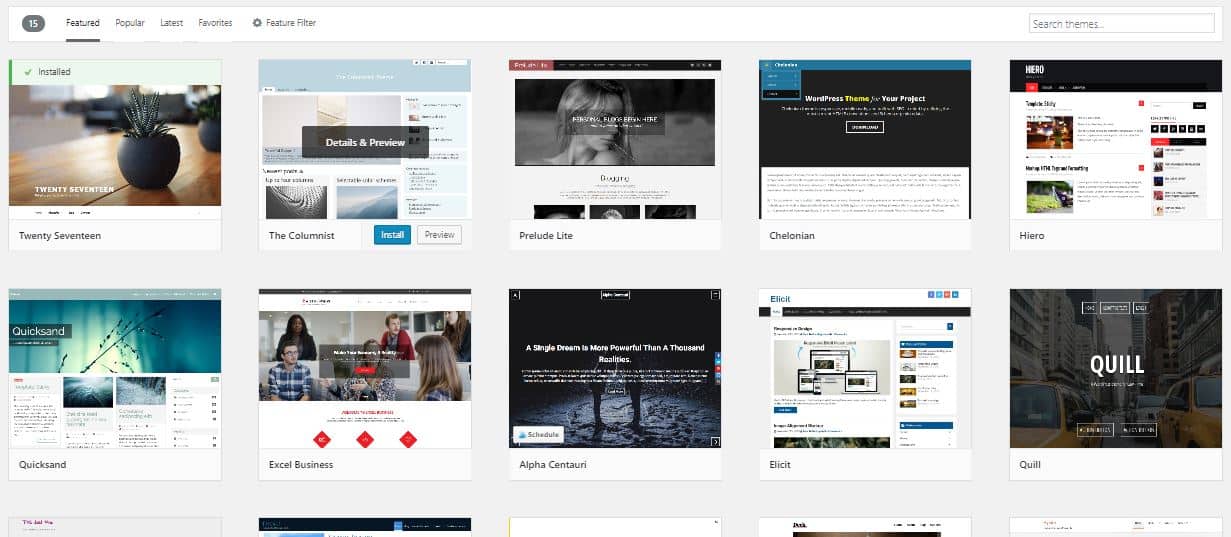
WordPress has a variety of free and premium themes.
Don’t worry too much about the theme because you can go back and change your theme easily without losing any of your blog posts!
I also offer web design for bloggers, so if you would like to have a custom designed blog, feel free to get in touch!
Step 7: Download Some Essential Plugins For Your WordPress Blog
I always recommend people to download Yoast when they are first setting up their blogs. Yoast is an SEO plugin that will help you make sure your posts are search engine friendly.
To install this plugin (or any plugin) head over to “Plugins” along the side of your WordPress dashboard and click “Add New”. Next, search up “Yoast”.
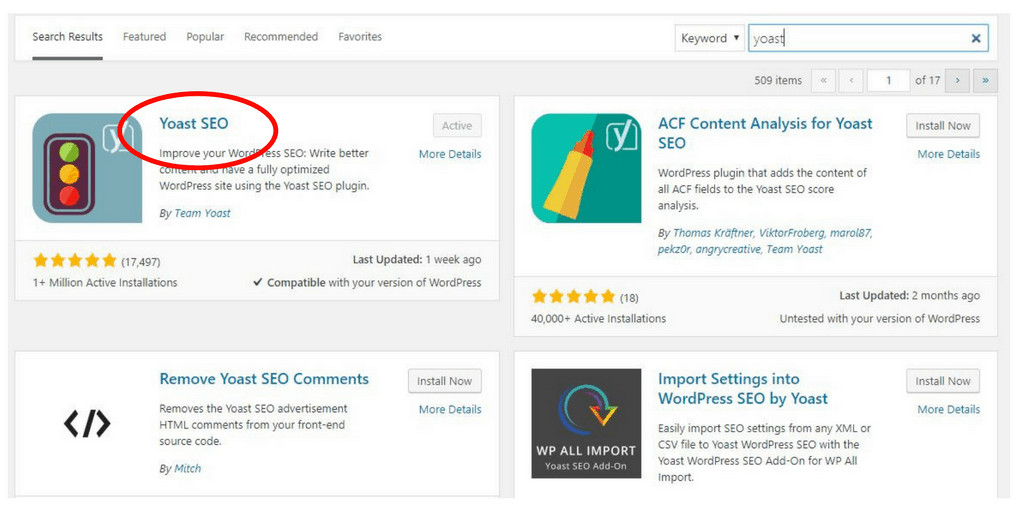
Since mine is already activated, mine says active. However, yours will say “Install Now” which you will want to click.
After, head back into your plugins by going to “Plugins” along the left hand side of your dashboard. This will bring up a list of all your plugins.
You need to find Yoast, and activate it by clicking “Activate”.
Now you have Yoast activated and are ready to start writing your first blog post!
Step 8: Start Blogging
Up until this point, I have walked you through step-by-step on the technical aspects of starting a blog on WordPress, so now let’s get into actually blogging!
I love blogging because it requires little to get started. While there are really good laptops for blogging, you can get started on whatever you currently have!
First, go over to “Posts –> Add New”.
From here it’s very easy! You will be brought to the place where you actually write your posts.
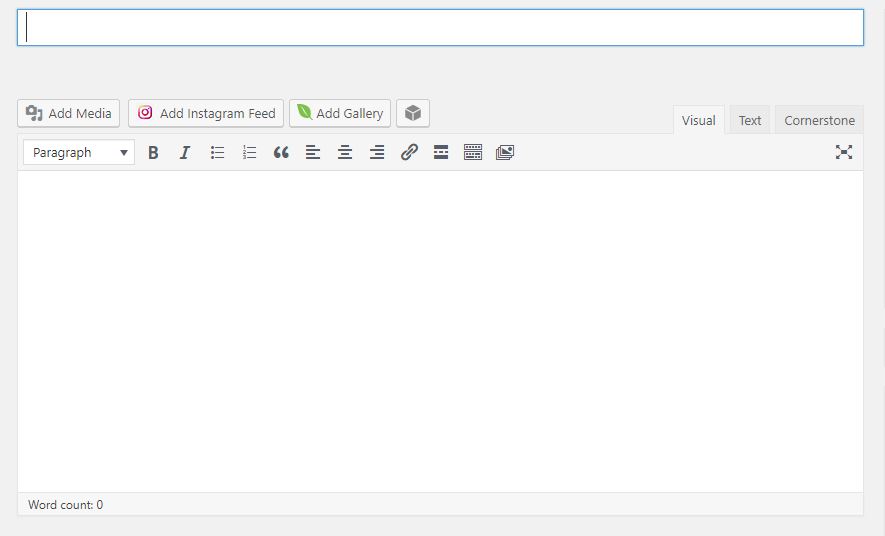
Using the visual editor makes it incredibly easy to start writing blog posts on WordPress. In the top area you will want to enter your title.
In the text editor below is where you write your actual content. By clicking on different elements in the text editor, you can bold your text, italicize it, add links etc. You can also easily add media (such as photos or videos) by click the “Add Media” button right above.
Once you have written your post, your next step is to scroll down where you will see the Yoast plugin at work.
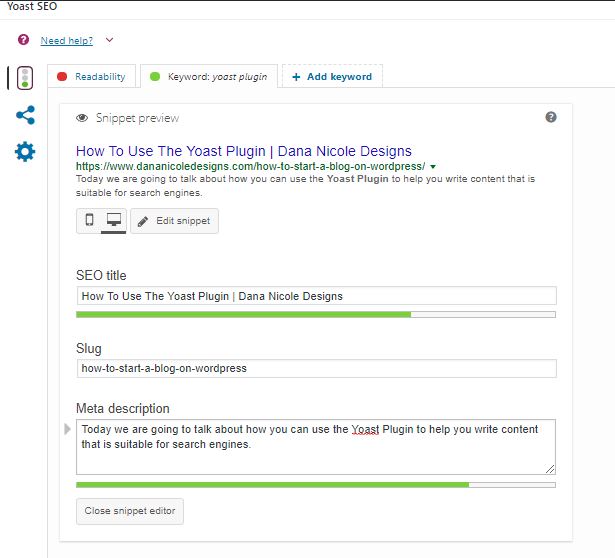
You should see something that looks like this. If you click on the snippet preview, you will be able to enter in your own title and own description for your blog post.
If you don’t do this, Google will display their own title for you, so it’s important to create your own. I usually make my title the title of my blog post, and create a meta description that summarizes what my blog post is about.
Your last step is to decide whether or not you want to display a featured images for your blog post! The featured image is located on the right hand side of WordPress when you are creating a post.

Click on “Set featured image” and your media library will automatically popup. From there, you can either select an image you have previously uploaded, or you can upload a new one.
After you’ve chosen your image, it’s time add some categories and tags into your blog post. Many bloggers get confused with categories and tags, so I will quickly differentiate them for you.
You should only have a few categories for your blog. Categories are broad topics. On my blog I have:
- SEO
- Branding
- Graphic Design
- Portfolio
- Featured Entrepreneur
- Personal
- Social Media
- Entrepreneur Resources
All of the blog posts I write can fit under one of these categories. As you can see, they are very broad! Your blog will only have one category.
Tags on the other hand can be more specific. For example, tags for this blog post could be something like:
- how to start a blog
- starting a blog from scratch
- how to blog
- how to blog on WordPress
And my category for this blog post would likely be “Entrepreneur Resources”.
It will be up to you to figure out what categories you want for your blog. You can always change these and rearrange them, and it isn’t necessary to use categories or tags when you start a blog on WordPress, but I highly recommend it!
It helps organize your site and helps with your SEO.
Your last step is to hit publish! Once you publish your post, you will be able to see it on your site!
This article may include affiliate links. As an Amazon Associate I earn from qualifying purchases.

Dana Nicole is an award-winning freelance writer for MarTech/SaaS who was rated one of the best SaaS writers by Software World. She specializes in writing engaging content that ranks high in search engines and has been featured in publications like Semrush, ConvertKit, and Hotjar.
Dana holds a Bachelor’s degree in Business Administration and has over 15 years of experience working alongside national brands in their marketing departments.
When Dana’s not working, you can find her dancing en pointe, cooking up new recipes, and exploring the great outdoors with her two big dogs.
I thought it would take weeks to learn everything I did from just 2 of your posts. Thank you so much!
Happy I could help, Crissy!