Last Updated on
I love Instagram and photography. Which is why I wanted to take a moment to talk about some of my favourite tools to use for editing my photos.
Edit In Lightroom
If you want to have consistency across your images, Lightroom is an incredible tool to have! And at only $9.99 a month for both Lightroom and Photoshop, it’s pretty affordable!
Lightroom is one of the tools of choices for the pros. Using Lightroom, I am able to do nearly all of my editing in one program. I’ve used a few free editing apps (such as Snapseed) which worked nicely, but I for what I want to do with my photos, I decided to use Lightroom. (Psst, keep reading to get my free lightroom presets).
Take the below photo for example:
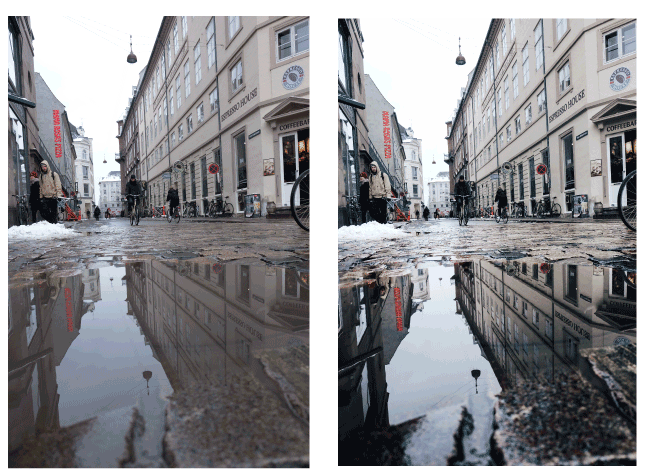
The photo on the left feels a bit flat, but through Lightroom I was able to add in some dynamic edits.
My favourite aspect about Lightroom though is just how easy it is to use for someone who doesn’t know much about photography.
Here is a summary of the edits that I do in Lightroom, I also have a complete beginners tutorial to Lightroom for those who want step by step instructions!
You can also make your own Lightroom presets if you download Lightroom, which can really help with your photo-editing process.
BASIC ADJUSTMENTS
- Shadows: I usually always increase the shadows by quite a bit
- I decrease the blacks (normally)
- I’ll adjust highlights and whites based upon the photo
- From here, if I still need to, I will adjust my exposure
- I’ll increase the contrast ever so slightly
- I usually avoid adjusting the temp and tints but if anything I will make my photos cooler but decreasing the temperature.
TONE CURVE
- I usually just incorporate the “s curve” into my photos, but will adjust if necessary
- Sometimes I will “crush the blacks” ever so slightly by dragging up the bottom left corner point just a few points.
HSL/SATURATION/COLOR
- I always bring down the saturation of my images, the colors I bring down the most are:
- blue
- red
- purple
- magenta
- I then go into color and adjust the hue of my greens, if there is green in my photo. I like a really rich and dark green, slightly desaturated.
NOISE REDUCTION/SHARPENING
- I’ll bump up my noise reduction a tad. Sometimes I have to increase it a lot if I have shot in low light, however, my Instagram photos are all mostly shot in bright and well lit areas.
- Bump of the sharpening
- Mask out a little depending on what I don’t want to be sharpened
Lightroom also allows users to purchase or download presets which they can use on any photo. Presets are a group of edits that you can apply to a photo all at once, quickly and easily.
I started out in Lightroom with a pack of VSCO filters that I had purchased, and began to play around with my photos that way. Once I was comfortable enough with the program, I began to develop my own presets to use on my photos.
Lightroom does have a free app for those who want to give a free version a try before splurging. I’ve never used the app because I’ve just always had Lightroom available on my computer as it comes with my graphic design software.
To learn more about Lightroom, please click here. They have a great photography package which I think is seriously a steal…you get Photoshop and Lightroom for $9.99 a month with an annual subscription!
Facetune
I bought Facetune for the price of a cup of tea and before I started using Lightroom, I only used Facetune. So if you aren’t ready to invest in Lightroom I highly recommend investing a couple dollars into Facetune.
Facetune has some really nice features, my favourite being the whiten feature. This whiten feature gets rid of any hues that your whites may have.
I actually quite like Instagram’s in-app editing capabilities to fine tune my photos before uploading them. I tend to always sharpen my image just a little bit more and may use the other tools (such as desaturation or increasing the brightness) depending on the photo. I also almost always straighten my photo in Instagram as I find it much easier to straighten on my phone than on my computer.
UNUM
Although I don’t use UNUM to edit my photos, I do use it to plan my feed which is a very important piece of Instagram. Planning my feed allows me to see how the overall aesthetic of my images look together.
———-
Finding a photo editing style that reflects your brand takes a bit of trail and error. I go for a bright and airy look which I achieve through my free lightroom presets, so if you are hoping to achieve a similar look, don’t forget to download them!
Other free apps such as Facetune, the free Lightroom app and UNUM can help you plan and organize your Instagram feed.
This blog post contains affiliate links which I will earn a small commission from if you sign up, however my opinions are all my own.
This article may include affiliate links. As an Amazon Associate I earn from qualifying purchases.
Dana Nicole is an award-winning freelance writer for MarTech/SaaS who was rated one of the best SaaS writers by Software World. She specializes in writing engaging content that ranks high in search engines and has been featured in publications like Semrush, ConvertKit, and Hotjar.
Dana holds a Bachelor’s degree in Business Administration and has over 15 years of experience working alongside national brands in their marketing departments.
When Dana’s not working, you can find her dancing en pointe, cooking up new recipes, and exploring the great outdoors with her two big dogs.